Star De-Emphasis Article
Star De-emphasis by Adam Block
PUBLISHED in 2018
(*After* you read the article below, please see the simplified version I posted on YouTube.)
This is my innovation which (in my opinion) improves upon the best techniques currently widely known for minimizing the impact of stars on a crowded star field. In PixInsight the method de rigueur is to use Morphological Selection. Morphological selection is basically a variation of the erosion filter which applies a combination of dilation and erosion to maintain star shapes. Unfortunately these processes produce tell-tale artifacts in the pixels that neighbor the star's edge. Thus the technique, although useful- is one that does not come across as entirely "natural."
The technique outlined below does not directly use erosion! Instead it relies on a kind of "content aware" substitution of pixels that surround the edges of stars while at the same time maintaining their cores (if desired). This is not a technique that removes stars- instead it lessens their impact of visual confusion and distraction by both dimming and somewhat shrinking the multitude of stars in the image.
These steps are applied to a non-linear (already permanently stretched) image. It is recommended to use this technique on data that has *not* already been aggressively smoothed by noise reduction. As you will see below, the secret is matching the noise (grain/texture) of the pixels near stars.
Even if you find the method is not your style- I think you may find the many techniques I used to implement this method are powerful in and of themselves!
The overall all steps are as follows:
- Construct an image that will serve as the pixels to substitute into your actual color image. Using a star mask to remove the many stars with MMT and then use NoiseGenerator to match the surrounding sky. The resulting picture will be the source of the substitute pixels.
- Next make a star mask that is slightly dilated and blurred. This mask will be applied to your color image.
- Transform this newly created star mask into a halo mask by subtracting (Pixel Math) the extracted Luminance from your color image. The result will be an image filled with donuts that have the inverted brightness profiles of stars!
- Finally write the pixels from the mostly star removed image to your color image with the halo mask in place.
- You may iterate the process by extracting a new Luminance from the now slightly adjusted image and adjusting the halo mask for another round of pixel substitution.
Definitions:
- Sub_Pix: This is the image with the substitute pixels. It has its own star mask called sub_pix_mask.
- Main_Mask: This is the main star mask you can use to generate the star mask for Sub_Pix and Halos.
- Halos: This is the star mask, made from the main mask, you can apply to your color image.
- Big_stars: You might want to remove large stars from your Main_Mask with Morphological closing. This technique doesn't handle really big stars well... and they really aren't the issue star de-emphasis is trying to handle.
First apply RGBWorkingSpace to your color image if you have not done so yet. This will be helpful later when we extract the L channel from your color image.

Next make a copy of your original color image and change its name to Sub_pix.
From either color image (they are the same at the moment), extract the L channel and create the Main_Mask using MLT. Note that I removed the single pixel layer (there are no single pixel stars to worry about) and the Residual layer. Increase or Decrease the total number of layers to control the spectrum of star sizes. In this technique, I tend to allow bright stars and then remove them from the mask later. Binarize this mask by selecting one of the faint stars as the threshold value. This will make everything you have captured here white.


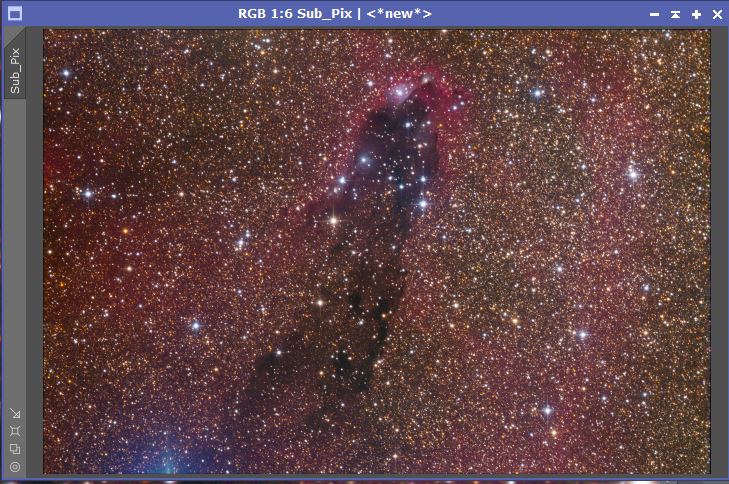
Now make a copy of the Main_Mask. This will become a star mask for Sub_Pix that we will use to remove some stars. Then make the stars larger with a very healthy dilation using Morphological Transformation. The numbers you use for these processes depend sensitively on your data- so the values I am using are only an example.

Apply this mask to Sub_Pix and examine. There should be a *healthy* (more than necessary) margin surrounding all stars. When you create your halo mask later, you will dilate the Main_Mask by a value *less* than what you are using here.

Remove the stars using MMT. It is likely the number of layers you used to generate the star mask in the first place is sufficient- or increase by one layer. However this time only include the Residual layer.

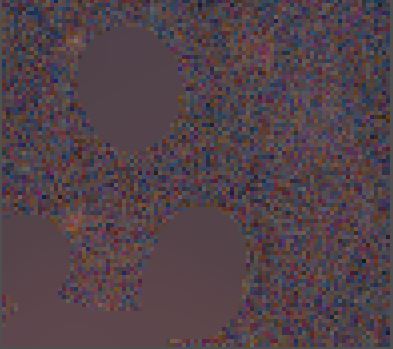
The next step is the main thing that makes this technique work. Your job is to match the grain/texture/noise of the flat patches to the surrounding sky using a combination of Noise Generator, Convolution, and Color Saturation (Curves Transformation). In cases where no noise reduction or interpolation has occurred, Noise Generator will give you the result you want instantly. If you have, as a single example shown here, registered binned RGB data to unbinned Luminance- the color blobs of the sky need to be matched. It doesn't need to be perfect...but the better it is done- the better the star de-emphasis will be free of tell-tale artifacts.
Try to first get the pixel "grain" correct by using Noise Generator. Then smooth this result with Convolution if patches of color larger than the grain size are present. Finally, match the color saturation of the color if necessary.

Here is another example where I have very accurately matched the patches with the background. It is hard to see any MMT patches at all:
This completes the first, and most important, part of the process. What follows next is the construction of the halo (contour-like) star mask to be applied to the original image. First make a copy of the Main_Mask star mask (what you started with). Name this mask Halos. Optionally remove the larger stars from the mask. Then dilate and smooth (convolution) the mask by an amount than is less than the dilation magnitude chosen for the Sub_Pix mask for star removal. If you dilate more than this- you will be including information that goes beyond your created pixels (which is OK to a point)- and potentially reveals a hard boundary. In the above I dilated with a structure element of 7, so I will dilate here with 5 and then use a little convolution. A small halo likely will do the job with minimum artifacts.

Next extract the L channel from your original color image. Name this "Lum".
Now.... and this is the cool part... subtract Lum from the Halos mask above! What results is below.

This type of mask has some wonderful benefits. The cores of the stars, the dark centers of the halos, have precisely the inverted stellar profile of the original stars. This makes the pixel substitution we are about to do relatively seamless. In addition, we can iteratively use the newly adjusted color image- extracting a new L channel and apply this processing again.
Now apply the Halos mask to the original color image and write the contents of Sub_Pix into the halos!

One iteration of this technique is quite subtle, but the effect is beneficial (especially if you zoom out and blink a "before" and "after" view.

For even greater de-emphasis of stars you can perform another iteration.
- Remove/Close the current Lum extracted image.
- Extract the L channel again from this adjusted color image (and call it Lum again).
- Using History or go back with CRTL-Z with the Halos mask and this time only dilate by 3 pixels (or something less than last time). Still do a little convolution.
- Subtract Lum from Halos like before.
- Apply Halos to the color image and write the contents of Sub_Pix into the image again.

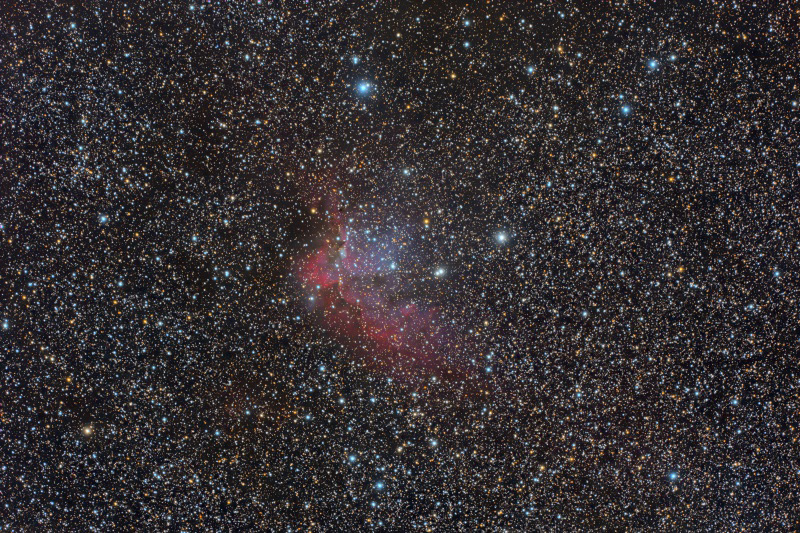
The above image was graciously provided by Terry Robison. The dark nebula and surrounding emission nebulosity is hampered by the sheer dazzle of stars. Thus by de-emphasizing them, the subject of the astrophoto is improved a bit in this star crowded field.

Here is a comparison of stars using my method and the more common method of Morphological Selection:

The first person that I am aware of posted his attempt at using the technique on April 20th, 2019. He was quite pleased! Here are the before and after results. (His name is Francesco Meschia.)